
Like this 8.8 inch with 1280 x 480 resolution instead of your OEM 6.5 inch with 600 x 800 resolution?
Wish to upgrade it by yourself? Now you can!
Here are the tools that you need!
1) Panel Clip Pry Open Tool

2) A Torx screwdriver (T20 size)

3) 8.8 inch screen for F45/F46 (Part number: 9370871 or 9387450)
Note: X1 F48 also uses similar screen but the part number is 9387451. It requires CID trim (part number 9353267 for Right hand drive car) to be installed together.
Can't wait to begin?
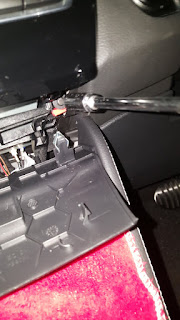
Step 1 : Use the pry open tool to pry the plastic cover underneath the CD drive. Remember not to pull out the plastic cover and you can simply leave it hanging. Note that there is a wire attached for ambient lighting.


Step 2 : Underneath the CD cover, you can find two torx screws attached to it. Unscrew them as shown below.
Step 3: Once the screws are removed, take out the cover together with the buttons and leave it hanging as shown below.

Step 4: WARNING!!! This is the hardest part! You have to remove the entire aircon dashboard using the pry open tool. Note that this will take some effort as the aircon dashboard is held tightly by the clips.
There are two separate wires connected to the air con dash board. One for the ambient lighting on the left area and the other for hazard light/lane departure buttons. Remember that there are 3 x aircon vent modules( one on the left, 2 at the center) which may dislodge by themselves and you have to fit it back slowly.
There are two separate wires connected to the air con dash board. One for the ambient lighting on the left area and the other for hazard light/lane departure buttons. Remember that there are 3 x aircon vent modules( one on the left, 2 at the center) which may dislodge by themselves and you have to fit it back slowly.
Important strategy to pry the aircon dash board off from the car.
Check out the arrows and follow the numbered sequence:


Observe the arrows highlighted in orange. These are the areas that are safe to pry. If your car comes with lighting package, do not pry open on the area marked with a red cross as it will potentially breaks your fibre optic lighting hidden underlying the dash.
You will need to use some strength to pry open all corners of the dashboard slowly. Use cloth to protect your dash board and glossy surfaces from scratches.
Do not pull those air con vent flaps by hand as it will detached itself easily and you will find yourself spending most of your time trying to assemble the flaps back instead of installing the screen!
In the event that those aircon vent module drop out from the air con dash, you have to snap the module back to the dash first before pushing the entire air con dash back to the car.
Note the highlighted areas where the aircon module needs to be clipped back onto the aircon dash before putting the entire dash board over to the car.

Warning: Remember that there are no more screws held within the air con dash board and you have to pry it open with full confidence! I will not be held responsible for any damages made to your dashboard during this process and there may be risk in damaging the clips or even the entire dashboard during the process. It is recommended to have two person to perform this job if you are doing it the first time.
Here are the closeup photos of the aircon dash board. Notice the underneath highlighted area of the clips which you will need to pry it open.
Left area:
Left area:

Right area:

Step 5: After some effort, the aircon dash board is finally released from their locks and you can leave it as hanging as shown below. Remember that there are two wires connected to it and do not pull out the whole dash board. Unscrew the two screws that held the 6.5 inch screen as shown below:

Step 6: Lift up the screen and check the back of the screen. There is a purple connector which provides the power and signal to the screen. Notice that there is a clip on the purple connector which you will need to push to unlock before pulling it out. It is held tightly and you may need the prying tool to assist in pulling it out.

Step 7: Replace it with the new 8.8 inch. The display will not show anything until you had performed your coding.

Step 8: Time to code!
Change the screen resolution and split screen options by setting the following options:
| Infotainment Screen | HU_ENTRYNAV | 3000 HMI | DISPLAY_SIZE_RESOLUTION | 8.8_1280x480 |
| Infotainment Screen | HU_ENTRYNAV | 3001 EXBOX | DISPLAY_VARIANTE | breites_display |

Success!
Step 9: Put your new 8.8 inch screw display back to the holder and screws it back using the same set of screws. Be very careful and make sure you do not drop your screws into the holes at the central console. Put back your dash board by pushing it back till you hear the "click" sound and put back your CD covers and the plastic cover.
Thanks mate. Very useful DIY.
ReplyDeleteYou are welcome... Hope you learn something about this important and popular mod!
DeleteHow do you code the display? What do I need and where do I input the values?
DeleteThis is a very great DIY guide! Thanks a lot for sharing this!
ReplyDeleteBtw, may I know what is the PN for the 8.8" LCD?
Thanks!
Part number for F45/F46 is either 9387450 or 9370871. Cheers!
ReplyDeleteMay I know where can we get this part?
DeleteIs it from ACCA?
You can get the used part from Ebay. Other online stockist do sell brand new as well but the price is around USD 2000!
DeleteHow about Taobao? It seems cheaper to get it from Taobao if it can work. About SGD600++
DeleteYou can try TB if you want. You have to confirm with the seller that they are selling "F45" model and not "F48" which is for X1. Also, ask them to package the product properly with sufficient protection.
DeleteNice, after this upgrade, do you get album art when playing music from usb, and play video directly from usb?
ReplyDeleteAlbum art works but not USB video. USB video is only supported in Navigation Professional (609) and anything lower like Navigation PLus (6UP and 6UN) does not support USB video even though video codecs have been enabled. This is a limitation on the hardware side.
DeleteAlbum art works but not video playback from USB since the EntryNav (Business Navigation) does not support USB video playback. Only audio works.
ReplyDeleteThanks. Can I upgrade it to NBT with navigation and touchpad?
ReplyDeleteFor F45/F46, you can upgrade it with navigation with touch idrive knob. Touch idrive upgrade is mentioned in my blog. Professional navigation (609) or Business navigation (6UN or 6UP) can be used. However, it looks like there is an additonal cable for the head unit for those with navigation. I am still exploring it.
ReplyDeleteWould you be considering to retrofit to install HD-link?
Deletehttp://indiwork.co.kr/shop/all-interface/hd-link/hd-link-iw04b-n-for-bmw/
http://indiwork.co.kr/shop/all-interface/hd-link/hd-link-iw04b-n-for-bmw/
Deleteseem like a very promising device for mirroring, anyone try it?
it seem wires need to be sliced will this void warranty ?
thanks in advance
Hi! thanks for sharing all this info, is really helpful!!
ReplyDeleteBy the way, if you are bored, I recommend you doing some vinyl wrapping of the central console, but only if you do not like the black-piano dust-catcher finishing of the original one... Check the 3M Scotchprint 1080 Black Brushed vinyl, you will like it.
Cheers!
Diego
This comment has been removed by the author.
ReplyDeleteHi!
ReplyDeleteThank you for the great and detailed guide.
Now for some one new like me would it be possible to make a video or a similar guide on how to code it using e sys. It will be really apriciated thank you.
E-sys video can easily be found in youtube. Try it! :-)
DeleteThis particular is not available.
DeleteHi, Robot Lover, well done with the DIY guide but I would need more detailed instructions for the F48 vehicle as the dash trims are slightly different - central dash trim (with A/C and radio) is one piece item (don´t know where to start - no screws?) and long air vents dash trim is also different. Please add photos of the procedures with F48 X1 vehicle or at least add detailed text. Also with the coding - I currently have the value 10.25_1280x480 within DISPLAY_SIZE_RESOLUTION string - although I actually have 6.5 inch screen. My question is whether should I leave that value or change it to 8.8_1280x480? Thanks in advance for your help. Best regards, E.
ReplyDeleteHi Elvis,
DeleteSorry, I don't have access to a X1 to show you how it can be done. You will need a different set of tool to pry open the central dash trim. You can check out the realoem.com to see how the parts looks like and to determine whether it can pry out safely. Please share the photos with me if you are able to do so.
You will need to change the screen resolution to 8.8_1280x480 when you change it to a bigger screen. Strangely, the default value is "10.25_1280x480" for X1 but it has to be changed to support 8.8 inch screen.
Hello. Where can I buy the 8.8 inch screen?
ReplyDeleteEbay is your best bet..
DeleteHello Sir, hv proceeded with change of screen (6.5 to 8.8) on my X1 F48 following the above steps however, what i really cannot understand is the encoding step, my 8.8 is totally black, how do i insert new commands ?
ReplyDeleteYr assistance will be appreciated
You will need to use E-sys to code your car to enable the 8,8 inch display resolution. You can find out how to code by checking "E-sys" in youtube. If learning coding is not your strength, you have to find someone that knows how to assist you..
DeleteThank you a lot ! Do you hv any idea of the info that i should hv with me that will be requested during encoding ?
DeleteThank you great guide
ReplyDeleteWhat is the best way to remove that plastic cover under the cd player, I can pop out the first 2 pins at the front but it seems to be stuck at the back somewhere?
ReplyDeleteHey there and thanks a lot for the valuable info.
ReplyDeleteI do not have navigation on my 6.5 screen and I have upgraded to an 8.8 one (android).
Will the split screen be available as coding?
Yes, after coding split screen will be available, but you will have to set it up under idrive display options... Best regards, E.
DeleteAwesome thanks
ReplyDeleteHow did you get the bottom panel out? I unclipped it but i couldnt open it wide enough to remove the screws.
ReplyDeleteYou need to give it a little bit of downward force to unclip the bottom panel. It's all held by plastic clip and there's no screws. If you have a LED for the ambience light, do take note of it and don't tear out the whole panel. Just give a bit of push downwards and it will unlock.
DeleteThanks! Useful guide you've done. One more question..Is it necessary to disconnect the battery before changing the screen?
ReplyDeleteYou do not need to disconnect the battery at all.
DeleteHello, I want to congratulate you on the excellent work you have done. All of this will be of great help to many people. I have an F45 I wanted to extract the head unit 6UP (CD is no longer works). The problem I have is that I cannot remove the bottom panel, I can lower the it a little I see the two upper plastic hooks are free, but if I try to lower by forcing the plastic bends and I don't want to break the bottom panel. I saw you managed to lower the bottom panel completely, how do you suggest me to do? I'd be happy to pay you a beer ... can you tell me on which account ? Thanks
ReplyDeleteIt's all held up by plastic clips. There is no other screw except for the ones that I had highlighted. What you need is confidence. ;-)
Deletehello Robot, you're right, I used another plastic tool and by forcing the two points you highlighted, I managed to open it. Thanks again
DeleteI have a f46 from 11/2017 with nbt evo system and a 6.5 "non-touch screen with reference 65506834913. The same that the lci mount without a browser. What 8.8" screen is compatible if I do codin ?. The 8.8 touch of the nbt evo or the non-touch of the nbt? Which reference is correct?
ReplyDeleteHave you any experience with fitting a mmi box in the f46 gran tourer. I am thinking of getting one from ebay but not sure if there is space to fit in centre console. I have an entry nav unit 10 inch screen and am wondering if carplay could be coded?
ReplyDeleteHello,
ReplyDeleteI want to upgrade my bmw 2 f46 which came with professional radio without navigation to a system with gps and 8.8 display. what is good and reasonable between android aftermarket navi and used NBT HU with 8.8 display?
Thanks in advance
I know this is a really old post, but I just wanted to thank you for the instructions - I did mine this morning in about half an hour and it looks awesome!
ReplyDeleteHow do you code the display? What do I need and where do I input the values?
DeleteHi I bought f46 series 2 gran tourer 20/21 plate
ReplyDeleteI like to upgrade for the 8,0 inch screen but my question is the reversing camera will be working if I will replace the original screen for this new product?
Yes, it will work.
DeleteI have the complete display, touchpad for sale if interested.
DeleteHey, thanks for your article, it's very good... I have a 218i SE F45, which comes with the 6.5 inch display as standard. I can see in the comments above that the 8.8 inch (non-touch) screens are compatible which have the part numbers 9387450 & 9370871. Do you know if the touch screen 8.8 inch f45 screen with the part number 6840317 is also compatible and would the touch screen function work?
ReplyDeleteHow do you code the display? What do I need and where do I input the values?
ReplyDeleteChange following options:
DeleteHU_ENTRYNAV 3000 HMI DISPLAY_SIZE_RESOLUTION to "8.8_1280x480"
HU_ENTRYNAV 3001 EXBOX DISPLAY_VARIANTE to "breites_display"
...and you are good to go! Best regards, E.