Wednesday, October 19, 2016

DIY Guide: How to retrofit Dynamic Cruise Control with braking on your BMW F45/F46 (No need to remove airbag or disconnect your car battery!!!)


Look no further! This is your ultimate DIY guide in enabling your Dynamic Cruise Control with braking on your BMW!

What do you need?

1) BMW Cruise Control switch ( Part number : 61319263551) for your BMW F45/F46


2) A Torx screw driver

3) A Philip screw driver

4) A pair of scissor

5) 2 x cable tie (small)

6) Some masking or scotch tape to protect your airbag area on the steering wheel


That's it!


Preparations:


1) You will need to disassemble your new cruise control switch so that you can plug it in with the existing cable on your steering wheel. Cut the cable tie on the wires so that you can pull out the wires safely from the white molex connector and you can put back the cover with its screws back after this operation.


 2) You have to perform the same steps for both side of the switches as both switches has to be replaced together to make it work.


3)  Paste the masking tape on the marked area around your air bag to prevent from accidental scratches as shown below:


Here are the steps!


Step 1: Rotate the steering wheel to your left:


Step 2: There is a hole just on the steering wheel just behind the speed limiter switch. Use your Torx screw driver to reach out to the hole behind to unscrew the torx screw. You may need to adjust your steering wheel to full extension mode to use your Torx screw driver more effectively. 

Once the screw is out, you will be able to pull out the switch slowly by hand. Note: Be prepared! The horn may accidentally be triggered no matter how careful you are!


Step 3: Cut the cable tie that is tied to the multi coloured wires. Unscrew the three screws behind the switch using your Phillips screw driver.


Step 4: Slowly pull out the cover.


 Remember that the PCB board is electrostatic sensitive. Try not to touch it with your bare hands! 


Step 5: Unplug the PCB from the molex connector.


Step 6: Connect it with your new Cruise Control switch.


Step 7: Put back the cover and the 3 x Phillips screws. Use a new cable tie to tie the wires back as well.


Step 8: Push the switch back slowly to the steering wheel. You may want to put some tape protection besides the edge of the air bag/horn before performing this operation to avoid scratches. Otherwise, you can always use a fine sandpaper to sand off those scratches. Note: Be prepared! The horn may accidentally be triggered no matter how careful you are!


Step 9: Looks completed? Well not quite so. You still need to replace the right hand side switch as well! The "Res" button on the Cruise Control switch will become the speed limiter function if you did not change the right hand side switch. Test it if you want!


Step 10: Rotate your steering wheel to the right as shown below:


Step 11: Perform the exact same steps as mentioned previously above. Note that there are two connectors connected to this switch. It is harder to pull out as it is held tightly by the black connector.


Step 12: Cut the cable tie and free up the wires.


 Step 13: Unscrew the 3 x Phillips screws and remove the back cover. Plug the molex connector back to the switch.


Step 14: Put back the cover as show below and screw back the 3 x Phillips screws.


Step 15: Note how short this black connector can be as highlighted in yellow circle below.  How can you ever attached this connector back to the switch in such confined space? Does that means you have to take out the air bag??? 

Warning: This is the most difficult part of the operation! This operation is more suitable for people with smaller fingers. Maybe you will need to ask your wife or girl friends to assist in this operation!


The fortunate answer is no! You don't have to take out the air bag. Simply pull the black connector together with the wire using only a tiny bit of your strength to extend it by few millimeters. Don't pull it too hard until it gets disconnected from the steering wheel! 

With the extended length, you will be able to plug it back to the switch securely and can push it back to the steering wheel. It takes some skill to do that but it's definitely possible.

Step 16: There you have it! A Cruise Control switch enabled car? 


Step 17: Not yet, you still have some coding to do! Perform VO coding by adding option 544 and then perform "Code" to all modules within your ECU. Remember to switch off your engine before doing that as it involves coding the DME module which requires engine to be stopped.

The whole process will takes about 5 to 10 mins. Lots of errors will start popping up! Once the coding has completed (With some errors reported on the modules in your E-Sys), wait for about 5 mins before starting your engine. Press the cruise control switch button and presto! The cruise control indicator is lighted up in your Kombi screen as shown below! 


Coding success! Cruise Control ready!!!

Wednesday, October 12, 2016

DIY Guide: Touch IDrive knob retrofit for your F45/F46


For those who are keen to retrofit your existing idrive knob to a touch version, look no further!

Here are the parts that you need:


  1. ECE touch module (BMW part number: 65829347470) Note: This is for English touch module. If you are using other language like Chinese or Japanese, you will need to use a different touch module.


     2. Touch controller (BMW part number: 65829350723)

     3. Y splitter cable adapter as shown in the photo above

4. Torx screw driver

5. Plastic prying tool


Here are the steps:


1) Shift your gear to "Reverse" or "Neutral" and switch off your car's engine. Engage your electric hand brake.

2) Ensure the electric hand brake is engaged to prevent rolling.

3) On your central console, use your fingers and feel the edge of the gear shifter as shown below and while pressing at the edge, pull it upwards. It will be detached and can be pulled up as shown in the second photo below.


4) Pull out the chrome linings around the gear as shown below.


 5) Now you are ready to pull out the central console.


 6) There are about some clips underneath the central console that can be pulled out by hand. Pull the central console out slowly by focusing at the corners where the clips are.


7) After you had pulled out the central console partially, you have to remove the clips on the top area by first removing the top cover as shown below:


8) Once the top cover has been removed, you will see one clip on both corners. Loosen them by using your fingers to press on the clips and lift the piece up together at the same time. You can use a cloth to cover the clips before attempting to unlock them.


9) Do remember that there are wires attaching to the central console. Slowly lift the central console up and reverse it to unscrew your iDrive knob from the screws and replace it with your new touch iDrive knob together with the ECE touch driver module. You can use a double sided tape to attach the ECE touch module inside the console compartment.


Observe the green colored connector below. It is plugged back to the original blue connector. Remember to make sure that the connectors fit properly. One common error is the connector are plugged in reverse position. You have to make sure that they are plugged in to the connector properly and snugly.


Touch iDrive Retrofit success!


Here is what you need to code:

HU_ENTRYNAV
3000
HMI
ZBE_TOUCH_INTERACTIVE_MAP
aktiv
HU_ENTRYNAV
3000
HMI
ZBE_TOUCH_SPELLER
aktiv
HU_ENTRYNAV
3000
HMI
ZBE_TOUCH_BROWSER
aktiv
HU_ENTRYNAV
3004
SYSTEM
EINSTELLUNGEN/ZBE_TOUCH
aktiv


Note: If the touchpad still does not work after the coding, you can try swapping the connectors to the touch iDrive and the US-ECE (or other language) module box.

Monday, October 3, 2016

DIY Guide: How to upgrade your 6.5 inch screen to 8.8 inch screen for your F45/F46 (BMW 2er Active/Gran Tourer)


Like this 8.8 inch with 1280 x 480 resolution instead of your OEM 6.5 inch with 600 x 800 resolution? 

Wish to upgrade it by yourself? Now you can!

Here are the tools that you need!


1) Panel Clip Pry Open Tool


2) A Torx screwdriver (T20 size)


3) 8.8 inch screen for F45/F46 (Part number: 9370871 or 9387450)

Note: X1 F48 also uses similar screen but the part number is 9387451. It requires CID trim (part number 9353267 for Right hand drive car) to be installed together.


Can't wait to begin?

Step 1 : Use the pry open tool to pry the plastic cover underneath the CD drive. Remember not to pull out the plastic cover and you can simply leave it hanging. Note that there is a wire attached for ambient lighting.


Step 2 : Underneath the CD cover, you can find two torx screws attached to it. Unscrew them as shown below.


Step 3: Once the screws are removed, take out the cover together with the buttons and leave it hanging as shown below.


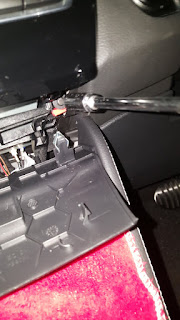
Step 4: WARNING!!! This is the hardest part! You have to remove the entire aircon dashboard using the pry open tool. Note that this will take some effort as the aircon dashboard is held tightly by the clips. 

There are two separate wires connected to the air con dash board. One for the ambient lighting on the left area and the other for hazard light/lane departure buttons. Remember that there are 3 x aircon vent modules( one on the left, 2 at the center) which may dislodge by themselves and you have to fit it back slowly.


Important strategy to pry the aircon dash board off from the car.

Check out the arrows and follow the numbered sequence:


Observe the arrows highlighted in orange. These are the areas that are safe to pry. If your car comes with lighting package, do not pry open on the area marked with a red cross as it will potentially breaks your fibre optic lighting hidden underlying the dash. 

You will need to use some strength to pry open all corners of the dashboard slowly. Use cloth to protect your dash board and glossy surfaces from scratches.

Do not pull those air con vent flaps by hand as it will detached itself easily and you will find yourself spending most of your time trying to assemble the flaps back instead of installing the screen!

In the event that those aircon vent module drop out from the air con dash, you have to snap the module back to the dash first before pushing the entire air con dash back to the car. 

Note the highlighted areas where the aircon module needs to be clipped back onto the aircon dash before putting the entire dash board over to the car.


Warning: Remember that there are no more screws held within the air con dash board and you have to pry it open with full confidence! I will not be held responsible for any damages made to your dashboard during this process and there may be risk in damaging the clips or even the entire dashboard during the process. It is recommended to have two person to perform this job if you are doing it the first time.


Here are the closeup photos of the aircon dash board. Notice the underneath highlighted area of the clips which you will need to pry it open.

Left area:


Right area:


Step 5: After some effort, the aircon dash board is finally released from their locks and you can leave it as hanging as shown below. Remember that there are two wires connected to it and do not pull out the whole dash board. Unscrew the two screws that held the 6.5 inch screen as shown below:


Step 6: Lift up the screen and check the back of the screen. There is a purple connector which provides the power and signal to the screen. Notice that there is a clip on the purple connector which you will need to push to unlock before pulling it out. It is held tightly and you may need the prying tool to assist in pulling it out.


Step 7: Replace it with the new 8.8 inch. The display will not show anything until you had performed your coding.


Step 8: Time to code!


Change the screen resolution and split screen options by setting the following options:

Infotainment
Screen
HU_ENTRYNAV3000 HMIDISPLAY_SIZE_RESOLUTION8.8_1280x480
Infotainment
Screen
HU_ENTRYNAV3001 EXBOXDISPLAY_VARIANTEbreites_display


Success!

Step 9: Put your new 8.8 inch screw display back to the holder and screws it back using the same set of screws. Be very careful and make sure you do not drop your screws into the holes at the central console. Put back your dash board by pushing it back till you hear the "click" sound and put back your CD covers and the plastic cover.


Tuesday, September 27, 2016

Coding: How to enable "Enhanced USB and Bluetooth functionality" in your BMW 2er F45/F46


BMW delivers standard blue tooth functionality for your cars. However, do you know that your car actually comes with this hidden "Enhanced USB and Bluetooth" feature which  allows two phones to be paired with your bluetooth interface and able to access your text messages and emails and able to read out to you while you are driving?

To check your phone compatibility, please visit this link:

http://www.bmw.com/com/en/owners/navigation/bluetooth/compatibility_check_tool.jsp?region=ROW&country=XQ


Currently, Apple phones are not able to access emails or text messages. Android phone makers like Samsung and Sony are able to access your text messages and emails as shown in the above photo.


Here's what you need to do:

1) Review the VO code edit steps shown here: 


http://www.bmwesys.com/guides/VO%20Coding%20Step-by-Step%20Guide.pdf


2) On step 5 of the mentioned PDF, simply add VO code "6NS" to the element instead of removing any values.


3) Perform the rest of the mentioned steps and perform "code" on your "HU_ENTRYNAV" module only. Note that it will code back to your original factory setting. 


4) Remember to backup your CAFD files as these steps involves factory reset your HU_ENTRYNAV module entirely and all your customized codes will be gone. Be familiar with CAFD files restoration steps to recover your original settings.


5) Unpair all your phones from your bluetooth 

6) Go to the Bluetooth section, press the "Option" idrive button and go to "Options" -> "Configure Bluetooth" and check the "Telephone 1" and "Office" options. 


If you are pairing 2 phones, the first one should be selected as Telephone 1 during pairing and the second one needs to be selected as Telephone 2 for both phones to work at same time. 


5) Test your new enhanced bluetooth functionailty by pairing your phones and enjoy the music!

NOTE: If you have coded your ECU with 8.8 inch screen, you will need to set the correct settings for your display resolution and display variante parameter otherwise, it will display a blank screen instead.

Thursday, September 1, 2016

DIY Guide: How to change your BMW air con filter


Changing of air con filter should be an easy task for most cars. Not with a BMW 2 series though. The air con filter is located at the most obscure place ever and it's beyond my understanding on why would it be located at such hard to reach places. 

Take a look!

BMW Air con filter Part number: 64116823725

Step 1:

Use a torx screw (size: 15mm) driver to unscrew the torx screw located under the driver's steering wheel near the foot resting well as shown below:


Step 2:

Once unscrew, you can take out the plastic cover which will reveal the air con filter holder.


Step 3:

Open the air con filter holder flap by pressing the handle as shown in the highlighted arrow. Your finger should be able to open this flap without any tools but be extra careful. Get someone to help you hold a torch if needed.


Step 4:

Once the air con filter holder flap is opened, you will be able to see the air con filter. Take it out for inspection and vacuum or change it if required. Use a pair of pliers if it is difficult for your fingers to pull it out.

Note the air flow arrow direction and make sure to put it back the same way as indicated below.


Also, do note that there are 2 pieces of aircon filter inside and you need to take the top one first before digging out the other one.


Here's how it actually looks like when installed inside.